AV Instructions: ETB 535: Difference between revisions
No edit summary |
(Combine two headers together) |
||
| (7 intermediate revisions by 3 users not shown) | |||
| Line 1: | Line 1: | ||
__TOC__ | |||
1. | ==== Important Information ==== | ||
READ ME FIRST: | |||
The HDMI switch is setup to allow for input selection but there is only 1 audio input. The audio cable needs to be plugged into the system that is used to give sound. The HDMI will not have sound output. | |||
==== Equipment Usage ==== | |||
===== Connecting to projector ===== | |||
1. Open the AV cabinet with the key set used to open the room | |||
[[File:The_cabinet.png|center]] | |||
2. Ensure the AV cabinet power switch is ON and all systems have power. | |||
[[File:Figure_1-_ETB_535_AV_cabinet_control_panel.png|center|frameless|607x607px]] | |||
3. Confirm that the “HDMI PC” input is selected on the AV cabinet control panel. It will be indicated by a lit green led beside the button. | |||
[[File: | 4. The projector may receive input either from the desktop at the podium or a separate device connected using the HDMI input. | ||
[[File:525 Desktop and HDMI Input.jpg|center|thumb|768x768px|Figure 2: The HDMI cable input and audio jack (left) and the Desktop PC connected to projector (right)]] | |||
5. Either connect a device to the HDMI cable or login to the desktop PC shown. | |||
6. Plug the audio jack shown in Figure 2 into the device being used. | |||
7. Switch the projector input to the device being used. The input source displayed by the projector can be switched by clicking the button on the switch hanging in the front of the podium or by using the switch's remote. Note: | |||
* '''Input 1 is the Computer on the desktop''' | |||
* '''Input 2 is the HDMI cable that is on the desk''' | |||
[[File:535 HDMI Switch and Remote.jpg|center|thumb|600x600px|Figure 4: The HDMI switch box hanging in front of the podium (left) and it's remote (right)]][[File:Epson_remote.png|thumb|493x493px|Figure 4: Epson projector remote]] | |||
8. Turn on the projector using the Epson remote blue power button. The remote may be in the AV cabinet drawer. The projector should automatically select “Computer” input upon powering on. If not then also press on the “Computer” input button. | |||
===== Turning off projector ===== | |||
1. To turn off the projector press the blue power button on the remote once and then a second time (a prompt will appear on the screen); you will hear the fans stop. | |||
2. Ensure to put the remote back in the drawer and to leave the AV cabinet powered on before securing the cabinet door | |||
===== Additional Adapters ===== | |||
1. There are adapters available if your device does not have an HDMI output port. These can be found in the tray at the bottom of the AV cabinet. Please return after use. | |||
[[File:Adapters9.png|336x336px]] | |||
==== Troubleshooting No sound ==== | |||
[[File:Audio_jack.png|thumb|Figure 5: Close-up of an audio jack]] | |||
1. Double check that the audio jack shown in Figure 2 is securely connected to the device being used. | |||
2. On the device, double check the sound settings | |||
* Ensure that you select the speaker/headphone audio output | |||
* Left-click the speaker icon in your taskbar, press/hold the right-arrow key on the keyboard until loud enough | |||
* If there is a red circle with an X, right-click the speaker icon, left-click Sounds, left click Playback, right click an option on the list, and left-click Enable; repeat this + 3a if necessary | |||
* On the same menu as 3b, left-click Set as Default Device, test by repeating 3a , and repeat this if necessary | |||
3. Ensure the speakers are powered, on, and sound turned up. | |||
4. Check the AV cabinet volume knobs are turned up and all AV cabinet sections are powered on. There are three sections outlined below | |||
4. a) At the top of the cabinet, turn the knob clockwise, ensure HDMI light is green (if not, press the button adjacent to it). | |||
a | |||
[[File:Turn the knob in the cabinet.png]] | [[File:Turn the knob in the cabinet.png]] | ||
4. b) At the middle of the cabinet, ensure the switch is in the ON position (red light) and the orange-outlined button is in the ON position (pops out less from the surface, the screen will be orange) | |||
orange-outlined button is in the ON position (pops out less from the surface, the screen will be | |||
orange) | |||
[[File:Middle of the cabinet demonstration.png]] | [[File:Middle of the cabinet demonstration.png]] | ||
4. c) At the bottom of the cabinet, ensure the button is in the ON position (pops out less from the surface) and turn the knob clockwise | |||
from the surface) and turn the knob clockwise | |||
[[File:Bottom of the cabinet.png]] | [[File:Bottom of the cabinet.png]] | ||
Latest revision as of 14:34, 28 October 2025
Important Information
READ ME FIRST:
The HDMI switch is setup to allow for input selection but there is only 1 audio input. The audio cable needs to be plugged into the system that is used to give sound. The HDMI will not have sound output.
Equipment Usage
Connecting to projector
1. Open the AV cabinet with the key set used to open the room
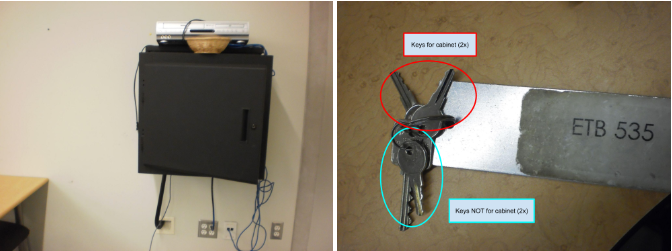
2. Ensure the AV cabinet power switch is ON and all systems have power.
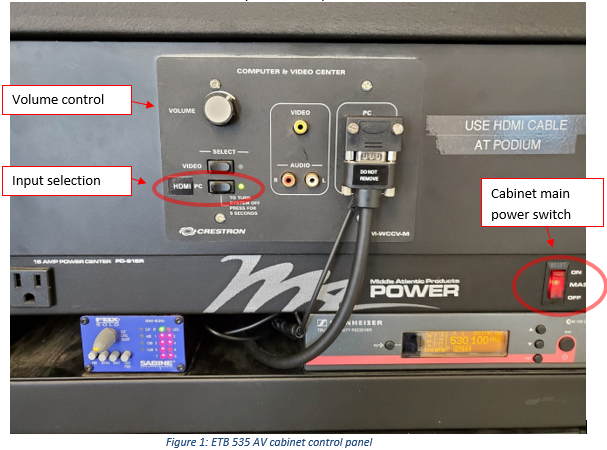
3. Confirm that the “HDMI PC” input is selected on the AV cabinet control panel. It will be indicated by a lit green led beside the button.
4. The projector may receive input either from the desktop at the podium or a separate device connected using the HDMI input.
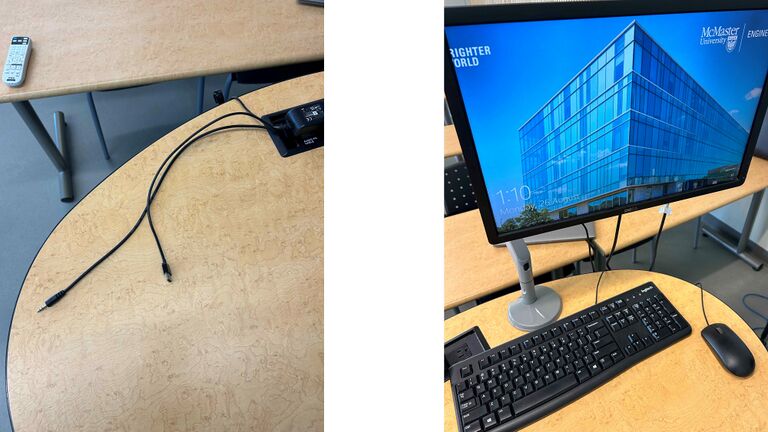
5. Either connect a device to the HDMI cable or login to the desktop PC shown.
6. Plug the audio jack shown in Figure 2 into the device being used.
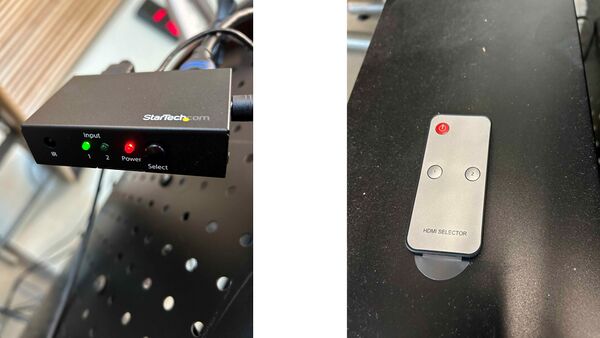
7. Switch the projector input to the device being used. The input source displayed by the projector can be switched by clicking the button on the switch hanging in the front of the podium or by using the switch's remote. Note:
- Input 1 is the Computer on the desktop
- Input 2 is the HDMI cable that is on the desk
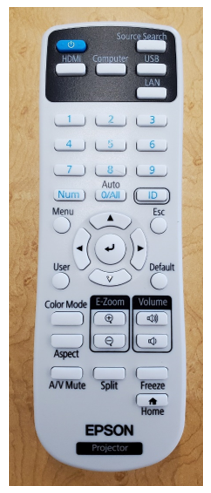
8. Turn on the projector using the Epson remote blue power button. The remote may be in the AV cabinet drawer. The projector should automatically select “Computer” input upon powering on. If not then also press on the “Computer” input button.
Turning off projector
1. To turn off the projector press the blue power button on the remote once and then a second time (a prompt will appear on the screen); you will hear the fans stop.
2. Ensure to put the remote back in the drawer and to leave the AV cabinet powered on before securing the cabinet door
Additional Adapters
1. There are adapters available if your device does not have an HDMI output port. These can be found in the tray at the bottom of the AV cabinet. Please return after use.
Troubleshooting No sound

1. Double check that the audio jack shown in Figure 2 is securely connected to the device being used.
2. On the device, double check the sound settings
- Ensure that you select the speaker/headphone audio output
- Left-click the speaker icon in your taskbar, press/hold the right-arrow key on the keyboard until loud enough
- If there is a red circle with an X, right-click the speaker icon, left-click Sounds, left click Playback, right click an option on the list, and left-click Enable; repeat this + 3a if necessary
- On the same menu as 3b, left-click Set as Default Device, test by repeating 3a , and repeat this if necessary
3. Ensure the speakers are powered, on, and sound turned up.
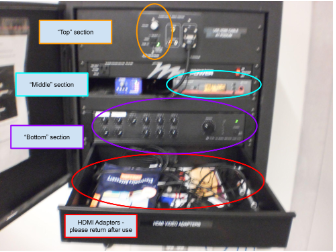
4. Check the AV cabinet volume knobs are turned up and all AV cabinet sections are powered on. There are three sections outlined below
4. a) At the top of the cabinet, turn the knob clockwise, ensure HDMI light is green (if not, press the button adjacent to it).
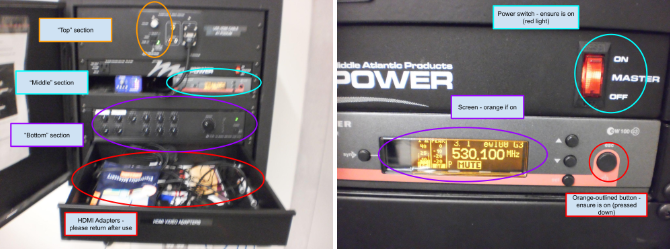
4. b) At the middle of the cabinet, ensure the switch is in the ON position (red light) and the orange-outlined button is in the ON position (pops out less from the surface, the screen will be orange)
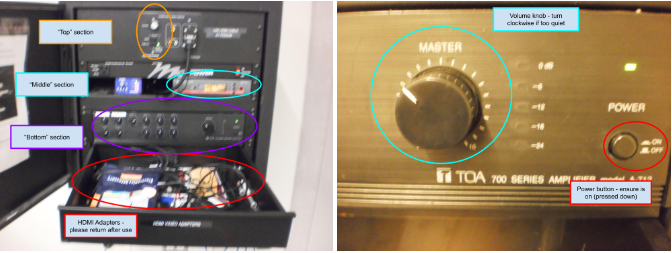
4. c) At the bottom of the cabinet, ensure the button is in the ON position (pops out less from the surface) and turn the knob clockwise
