AV Instructions: ETB 223: Difference between revisions
From SEPT Knowledge Base
(Update page with instructions for the new Smart TV) |
(Improved formatting) |
||
| Line 1: | Line 1: | ||
== Overview == | == Overview == | ||
[[File:ETB-223-TV-Overview.png|frameless]] | [[File:ETB-223-TV-Overview.png|center|frameless|471x471px]] | ||
== Turning On == | == Turning On == | ||
There are 2 options for turning the TV on: | There are 2 options for turning the TV on: | ||
# Press the power button on the front control panel (shown below). | |||
# Point the TV remote at the screen and press the power button. Remote shown to left | |||
[[File:ETB-223-TV-Buttons.png|center|frameless|357x357px]] | |||
[[File:ETB-223-TV-Buttons.png|frameless]] | |||
== Main Page == | == Main Page == | ||
[[File:ETB-223-Smart-TV-Main-Page.png|frameless]] | [[File:ETB-223-Smart-TV-Main-Page.png|center|frameless|360x360px]] | ||
== Presenting == | == Presenting == | ||
| Line 18: | Line 17: | ||
AirSync is a way to cast your computer/phones screen to the SmartTV over the internet | AirSync is a way to cast your computer/phones screen to the SmartTV over the internet | ||
# Turn on the board following instructions in the Overview section. When the board turns on you will be on the login screen; select “Continue As Guest”. This will bring you to the home page. At the center of the screen there will be a row of apps; click on the AirSync app (shown on page 3). | |||
# The AirSync app will show a display code and one-time-password which changes every 30 seconds. | |||
# On the computer you want to cast to the screen, open a web browser and go to airsync.net and enter the display code and one-time-password | |||
# When step 3 is completed a pop-up will appear on the TV asking if you would like to accept the screen share. Select “Accept”. | |||
# When step 4 is completed a pop-up will appear in your browser (see below). This pop-up allows you to choose to share a window, a web browser tab, or the whole screen. A selection must be made to be able to click the share button. Making a selection involves selecting the type (window, tab, screen) AND one of the options of that type, even if there is only one option of that type. The option will become highlighted by a blue border and the share button will turn blue. | |||
[[File:ETB-223-AirSync.png|center|frameless|627x627px]] | |||
[[File:ETB-223-AirSync.png|frameless]] | |||
=== Using USB-C === | === Using USB-C === | ||
# Turn on the board following instructions in the Overview section. When the board turns on you will be on the login screen; select “Continue As Guest”. | |||
# Locate the UBS-C cable on the carriage under the TV. Insert into your laptop USB-C port. | |||
# The TV may automatically switch to displaying your laptop screen when the USB-C cable is connected. However, if it does not, then press the “Input” button on the remote (shown on page 3). This will bring up a menu in the center of the TV screen. Use the arrow keys to navigate through the input sources to the USB-C input source (see image below). The USB-C input source icon should be colored dark grey, if it is colored light gray as shown below then the TV is not receiving input from USB-C. | |||
The pop-up input menu: | The pop-up input menu: | ||
[[File:ETB-223-Smart-TV-Input-Selection.png|center|frameless|610x610px]] | |||
=== Using HDMI === | |||
# Follow the instructions for USB-C, but use the HDMI cable and HDMI input shown in the image above. | |||
== Conference Calls == | == Conference Calls == | ||
4. The Cam/Mic array has a remote (shown below) which can control some of it’s features. The remote has buttons to mute the microphone, turn off video, turn off sound, zoom in/out, and adjust volume. Additionally, there are arrows on a wheel, these can be used to adjust the view of the camera, panning up/down/left/right | # Connect a laptop to the TV via USB-C. Follow the instructions for presenting via USB-C. The USB-C connection to the TV allows use of the Webcam & Mic array that sits above the TV which is also connected to the TV. | ||
# Open the conference call app of your choice. Ensure that the microphone and webcam are set to “ViewSonic VB-CAM-201 Concam”. Zoom example shown below after step 4 | |||
# The Cam/Mic array that sits above the TV can pick up voices all around the table. However, if desired, there is a wired 360 microphone in the carriage under the TV. This can be moved to the center of the table, ideally equidistant from all participants. | |||
# The Cam/Mic array has a remote (shown below) which can control some of it’s features. The remote has buttons to mute the microphone, turn off video, turn off sound, zoom in/out, and adjust volume. Additionally, there are arrows on a wheel, these can be used to adjust the view of the camera, panning up/down/left/right | |||
[[File:ETB- | [[File:ETB-223_Zoom_Audio_Video_Selection.png|center|frameless|749x749px]] | ||
[[File:ETB-223_Conference_Call_Remote_Control.png|center|frameless|752x752px]] | |||
== White Board == | == White Board == | ||
# Turn on the board following instructions in the Overview section. When the board turns on you will be on the login screen; select “Continue As Guest”. This will bring you to the home page. | |||
# On the home page tap on the myViewBoard app. This is shown and identified on page 3 as the White board app. | |||
# When the white board app opens it a pop-up appears that asks if you want to login to a cloud service. This is not required; the pop-up can be closed by touching the X in the upper right corner. | |||
# Pens for use with the whiteboard can be found in the carriage under the TV. | |||
Latest revision as of 16:20, 12 November 2025
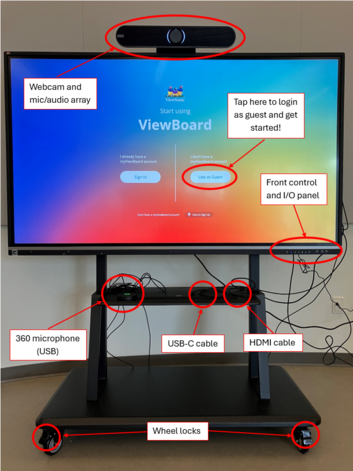
Overview
Turning On
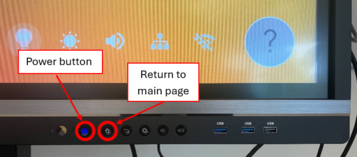
There are 2 options for turning the TV on:
- Press the power button on the front control panel (shown below).
- Point the TV remote at the screen and press the power button. Remote shown to left
Main Page
Presenting
Using AirSync
AirSync is a way to cast your computer/phones screen to the SmartTV over the internet
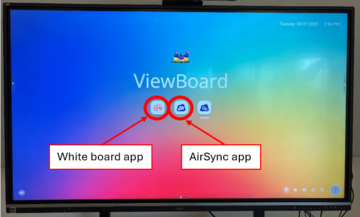
- Turn on the board following instructions in the Overview section. When the board turns on you will be on the login screen; select “Continue As Guest”. This will bring you to the home page. At the center of the screen there will be a row of apps; click on the AirSync app (shown on page 3).
- The AirSync app will show a display code and one-time-password which changes every 30 seconds.
- On the computer you want to cast to the screen, open a web browser and go to airsync.net and enter the display code and one-time-password
- When step 3 is completed a pop-up will appear on the TV asking if you would like to accept the screen share. Select “Accept”.
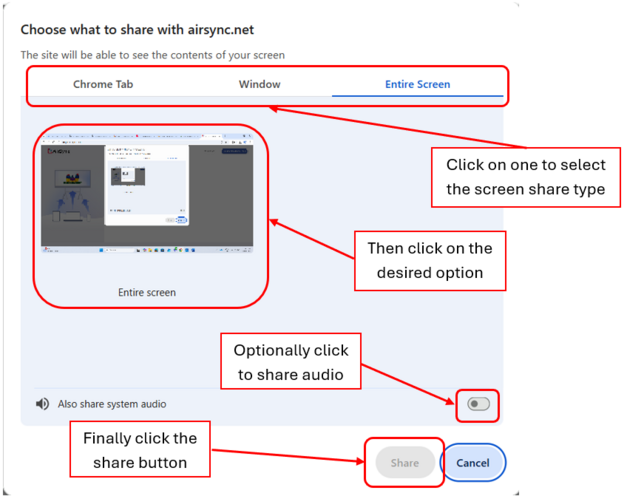
- When step 4 is completed a pop-up will appear in your browser (see below). This pop-up allows you to choose to share a window, a web browser tab, or the whole screen. A selection must be made to be able to click the share button. Making a selection involves selecting the type (window, tab, screen) AND one of the options of that type, even if there is only one option of that type. The option will become highlighted by a blue border and the share button will turn blue.
Using USB-C
- Turn on the board following instructions in the Overview section. When the board turns on you will be on the login screen; select “Continue As Guest”.
- Locate the UBS-C cable on the carriage under the TV. Insert into your laptop USB-C port.
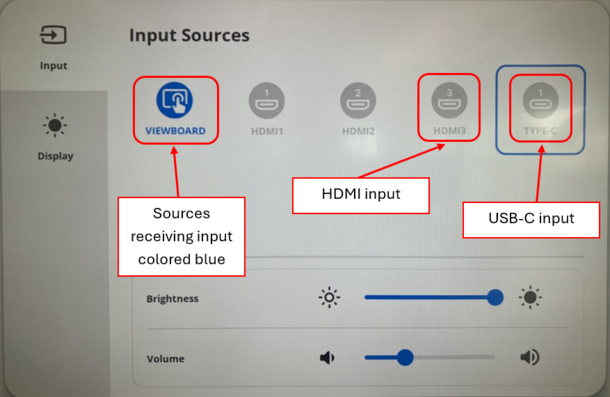
- The TV may automatically switch to displaying your laptop screen when the USB-C cable is connected. However, if it does not, then press the “Input” button on the remote (shown on page 3). This will bring up a menu in the center of the TV screen. Use the arrow keys to navigate through the input sources to the USB-C input source (see image below). The USB-C input source icon should be colored dark grey, if it is colored light gray as shown below then the TV is not receiving input from USB-C.
The pop-up input menu:
Using HDMI
- Follow the instructions for USB-C, but use the HDMI cable and HDMI input shown in the image above.
Conference Calls
- Connect a laptop to the TV via USB-C. Follow the instructions for presenting via USB-C. The USB-C connection to the TV allows use of the Webcam & Mic array that sits above the TV which is also connected to the TV.
- Open the conference call app of your choice. Ensure that the microphone and webcam are set to “ViewSonic VB-CAM-201 Concam”. Zoom example shown below after step 4
- The Cam/Mic array that sits above the TV can pick up voices all around the table. However, if desired, there is a wired 360 microphone in the carriage under the TV. This can be moved to the center of the table, ideally equidistant from all participants.
- The Cam/Mic array has a remote (shown below) which can control some of it’s features. The remote has buttons to mute the microphone, turn off video, turn off sound, zoom in/out, and adjust volume. Additionally, there are arrows on a wheel, these can be used to adjust the view of the camera, panning up/down/left/right


White Board
- Turn on the board following instructions in the Overview section. When the board turns on you will be on the login screen; select “Continue As Guest”. This will bring you to the home page.
- On the home page tap on the myViewBoard app. This is shown and identified on page 3 as the White board app.
- When the white board app opens it a pop-up appears that asks if you want to login to a cloud service. This is not required; the pop-up can be closed by touching the X in the upper right corner.
- Pens for use with the whiteboard can be found in the carriage under the TV.