Mounting File Share: Difference between revisions
mNo edit summary |
(Updated the steps and screenshots for how to mount file share in windows 11) |
||
| Line 3: | Line 3: | ||
=== Domain Joined (Department Computer) === | === Domain Joined (Department Computer) === | ||
==== Windows | ==== Windows 11 ==== | ||
Map a network drive to get to it from File Explorer in Windows without having to look for it or type its network address each time. | Map a network drive to get to it from File Explorer in Windows without having to look for it or type its network address each time. | ||
# Open '''File Explorer''' from the taskbar or the '''Start''' menu, or press the '''Windows logo key''' + '''E.''' | # Open '''File Explorer''' from the taskbar or the '''Start''' menu, or press the '''Windows logo key''' + '''E.''' | ||
# Select '''This PC''' from the left pane. Then, on the | # Select '''This PC''' from the left pane. Then, right click on the main window area and select '''Add a network location''' from the pop-up menu<br/>[[File:Add network drive option.png|500x500px]] | ||
# | # The "Add network location wizard" will pop-up, click '''next''' | ||
# On the next page, select '''Choose a custom network location''' then hit '''next''' | |||
# In the text box, type the '''path of the network drive'''. Then hit '''next''' [[File:Add network drive specify path.png|frameless|356x356px]] | |||
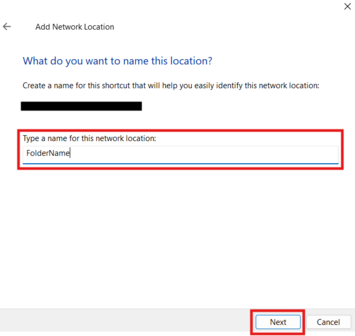
# In the next page, type the '''name the network drive''' will be given on your machine's filesystem. Then hit '''next'''[[File:Add network name window.png|frameless|355x355px]] | |||
# Select '''Finish.''' | # Select '''Finish.''' | ||
| Line 17: | Line 19: | ||
Map a network drive to get to it from File Explorer in Windows without having to look for it or type its network address each time. | Map a network drive to get to it from File Explorer in Windows without having to look for it or type its network address each time. | ||
# | # Follow the instructions for a Doman joined computer above | ||
# | # After clicking next on '''step 5''', a '''pop-up''' will come up asking for your '''credentials'''[[File:Add network login.png|frameless|393x393px]] | ||
# | # For '''username''' enter '''ads\[macid]''' where [macid] is your macid | ||
# For '''password''', enter your '''regular password''' | |||
# | # Click '''next''' and continue with the instructions for a Domain joined computer above | ||
# | |||
=== Mac OS X === | === Mac OS X === | ||
Revision as of 15:56, 14 October 2025
When off campus, a VPN connection is required for all shared folder connections
Domain Joined (Department Computer)
Windows 11
Map a network drive to get to it from File Explorer in Windows without having to look for it or type its network address each time.
- Open File Explorer from the taskbar or the Start menu, or press the Windows logo key + E.
- Select This PC from the left pane. Then, right click on the main window area and select Add a network location from the pop-up menu

- The "Add network location wizard" will pop-up, click next
- On the next page, select Choose a custom network location then hit next
- In the text box, type the path of the network drive. Then hit next

- In the next page, type the name the network drive will be given on your machine's filesystem. Then hit next
- Select Finish.


Workgroup (Personal Computer)
Windows 10
Map a network drive to get to it from File Explorer in Windows without having to look for it or type its network address each time.
- Follow the instructions for a Doman joined computer above
- After clicking next on step 5, a pop-up will come up asking for your credentials
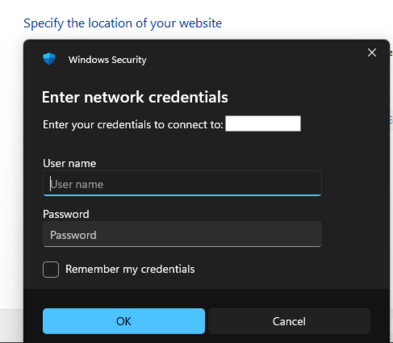
- For username enter ads\[macid] where [macid] is your macid
- For password, enter your regular password
- Click next and continue with the instructions for a Domain joined computer above

Mac OS X
To map network drives in OS X, do the following:
- On the finder menu bar, click GO > Connect To Server…
- Enter a network path in the Server Address: box.
- Example: smb://servername/sharename
- Click Connect
You can add the path to the list by clicking the (+) button. (This will save you from writing the path to the network drive next time you connect to network drives through VPN)
Congratulations! You are now connected to your network drive and folder.
- Note: If you are prompted to enter a password, select Registered User, and enter your MacID and password.
- Select the folder you would like to connect to and Click OK.
- Once connected you will see the folder will open and an Icon appears on the desktop, which is the network drive that you are connected to
Note: When you disconnect from VPN the network drive will disappear and you will have to follow the above steps to connect back to the desired network drive and folder.
